This is a guest post by Dane O’Leary from Beneath My Heart
The bathroom is one of the most popular, fun places to redesign and revamp, perhaps second only to the kitchen, which is the inspiration for this do-it-yourself tutorial.
There are more ways to do a bathroom vanity than you can count; the materials, colors, and styles can be combined in a variety of ways to either blend with the rest of your bathroom decor or maybe to become a focal piece of your bathroom. Butcher block — a common material used on kitchen islands — presents an inexpensive solution to giving your bathroom a sleek, modern new vanity that’s as durable as it is gorgeous. What’s more, it’s easier than you might think and could potentially save you hundreds if not thousands of dollars, especially if you already have some butcher block from a kitchen renovation. Here’s how you can make a beautiful new vanity either out of your interior design leftovers or with very little investment.

Step One: Plans, Measurements, and Materials
Once you’ve decided to install a butcher block vanity in your bathroom, plan your attack by figuring out if you’ll be removing and replacing existing cabinetry with something more minimal and modern or whether you’ll be installing the butcher block on top of your existing cabinetry. If you’ve decided to simply install the butcher blocks on the cabinets that you already have, then some steps won’t apply to you.
Next, you need to measure the dimensions of your current vanity so that you know how big your new vanity will be, which will determine the size of your butcher block as well as other materials like the height of the vanity’s legs.
After you have a plan and know the dimensions of your new vanity, it’s time to go shopping. If you don’t already have butcher block, it can be purchased very cheaply from many retailers including online stores. For example, a four-foot by three-foot birch butcher block costs just $149.95 from Global Industrial. Once you have your butcher block, simply use a circular saw to cut it down to the size you need and give the rough edges just a slight sanding, so they’re not too jagged and rough.
You’ll also need legs — choose legs that fit your desired style, whether traditional or modern — for your vanity to stand on such as newel posts, paint, your desired stain, polyurethane, a sink, and faucet fixtures. As for the equipment needed, you’ll like need a circular saw for cutting the butcher block and legs to size as well as a jigsaw for cutting the hole into the block for the sink. Then there are the obvious things like nails and a nail gun, a level, and boards for the sides of the vanity and the shelf on the bottom.
Step Two: Assembling the Vanity Stand
Before you install the butcher block, it needs something on which to stand. First make sure to cut each of your legs, the same amount from each end of each post, so that they’re exactly even in height. This is crucial. Otherwise your vanity won’t be level or sturdy.

The best way to attach the sides to the posts will be to attach anchor pieces to the posts. These anchor pieces are nailed into the posts so that the side boards can be attached to the anchor pieces and run between the posts rather than being attached to the posts directly.


This should be done at the top of the posts where the butcher block will be attached as well as near the bottom where you’ll be creating a shelf. Before moving on, check to make sure everything is level and trim if necessary.
Step Three: Attaching the Butcher Block
After the legs are connected with side boards on the tops and bottoms, and they’re all level, you’re ready to attach the butch block. Make sure that the block is centered on the legs, but that the backside is flush so it can go up against the wall. It’s a good idea to use an adhesive as well as nails to secure the butcher block to the legs.
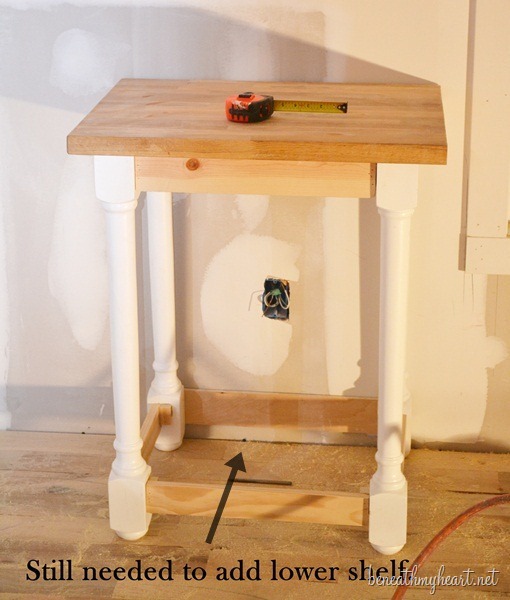
Once your butcher block is attached, cut your board down to size for the shelf and install it the same watch as the butcher block. Make sure you cut each of the corners so that they fit around the posts.
Step Four: Cutting a Hole for the Sink
Just about any sink on the market will come with a paper template that you use to cut corresponding holes on the countertop so the sink can be installed. Whether it’s a sunken sink that will be flush with the butcher block or a vessel sink that will sit on the butcher block like a bowl, cut the sink’s template into the butcher block using a jigsaw.
Step Five: Painting, Staining, and Installing the Sink
After the holes have been cut for the sink, it’s time to stain your butcher block and paint your vanity’s legs. It’s a good idea to do two coats of both paint and stain, then a coat of poly for the legs and at least two coats of poly on the butcher block to protect it from the moisture it’ll be exposed to in a bathroom. It’s also a good idea to sand in between each coat of poly that you apply to the butcher block to make each coat go on super smooth and to give your butcher block that professional-looking finish.

Before installing the sink, make sure to get your vanity into its final position and attach it to the wall with both adhesive and nails. Then install your sink, its fixtures as well as its corresponding plumbing.

For a final touch, put strips of trim along the vanity and shelves’ sides. It doesn’t need to be super ornate; it’s primary purpose is to make the boards used for the sides and the board used for the shelf to appear as a single piece. Once your trim is installed, step back and take a look at the fruits of your labor. Don’t forget to pat yourself on the back; you’ve finished your butcher block vanity.

For more design tips and tricks, head to Modernize.com.
Dane O’Leary is a writer from West Virginia. Dane typically writes about home and design topics for Modernize.com.
Share on Social

Grab your Free Gluten Free Recipe Pack
Discover 45 easy, healthy, and tasty recipes, including breakfast, lunch, dinner, treats and smoothies!
Recent Posts

Christmas Sugar Scrub – Easy Gift Idea


